Manufacturing Quality Control with AI: Achieving 99.8% Accuracy
What is Manufacturing Quality Control with AI?
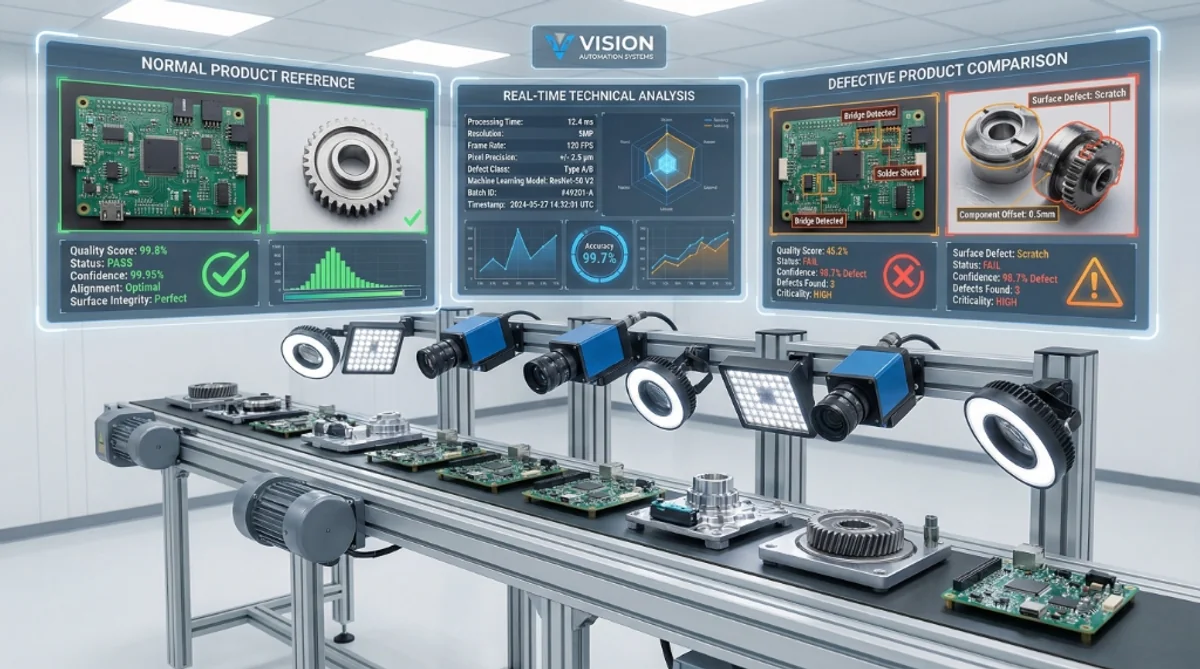
Manufacturing quality control with AI refers to the automated detection and classification of product defects using computer vision and deep learning algorithms. It describes how organizations deploy cameras and image recognition systems on production lines to inspect products in real-time, identifying surface defects, assembly errors, dimensional variations, and other quality issues without human intervention.
Quick Answer
AI-powered Quality Control uses computer vision and deep learning to inspect products in real-time, detecting defects with 96-99.8% accuracy compared to 70-85% for human inspection. By automating visual checks, manufacturers can reduce scrap by 30-45%, improve First Pass Yield (FPY) by 12-25%, and eliminate the "fatigue factor" inherent in manual inspection.
Implementing AI visual inspection is a critical step in a Manufacturing AI Implementation Guide that delivers measurable ROI in 3-6 months.
Quick Facts
- Defect Detection Accuracy: 96-99.8% (vs 70-85% human)
- Scrap Reduction: 30-45%
- ROI Timeline: 3-6 months
- Cost of Poor Quality (COPQ): 15-20% of revenue
- Inspection Coverage: 100% of production
Key Questions
How much more accurate is AI than human quality inspection?
AI systems consistently achieve 99% or higher accuracy, significantly outperforming human inspectors whose attention typically drops to 80-85% after just two hours of repetitive work.
What is the return on investment (ROI) for AI quality control?
Manufacturers typically see a full return on investment within 3 to 6 months, driven by reductions in scrap, rework, and expensive warranty claims.
Can AI detect defects invisible to the naked eye?
Yes, using multi-spectral imaging (IR/UV) and high-resolution industrial cameras, AI can identify microscopic cracks, thermal anomalies, and sub-surface defects invisible to humans.
Common Questions
How accurate is AI defect detection compared to humans?
AI systems consistently achieve 99% or higher accuracy, whereas human inspection typically hovers around 80-85%.
Humans are excellent at problem-solving but terrible at repetitive tasks. After just 2 hours of inspecting parts on a conveyor belt, human attention drops significantly due to fatigue. AI cameras:
- Never blink: Inspect 100% of parts, not just a sample.
- Never tire: Maintain the same precision at minute 1 as minute 600.
- See the invisible: Detect micro-cracks or thermal anomalies invisible to the naked eye.
What is the "Cost of Poor Quality" (COPQ)?
For most manufacturers, COPQ consumes 15-20% of total sales revenue.
This includes:
- Internal Failures: Scrap, rework, and re-testing costs ($20K+ per incident).
- External Failures: Warranty claims, returns, and recalls ($50K - Millions).
- Reputation: A single quality escape can cost a contract. The ripple effect of one defect can be $280,000+ for a mid-sized enterprise.
Can AI Visual Inspection work with my existing line?
Yes. Modern computer vision systems are non-invasive. They typically involve mounting high-resolution industrial cameras and lighting over existing belts or stations. The "brains" (inference server) sit nearby or in the server room, integrating with your reject mechanism (air blast, pusher) via standard PLC I/O.
Technical Deep Dive: Computer Vision Explained
How does the machine actually "see"?
1. Image Acquisition
Industrial cameras capture images of parts moving at high speed.
- Lighting is Key: Structured light or specialized strobes ensure defects cast shadows or stand out.
- Spectrum: Usage of Infrared (IR) or Ultraviolet (UV) to see sub-surface defects.
2. The AI Model (Deep Learning)
Unlike old "machine vision" (which looked for simple pixel counts), AI uses Convolutional Neural Networks (CNNs).
- Training: You show the AI 50 "good" parts and 50 "bad" parts (scratches, dents, missing labels).
- Learning: The AI figures out the complex patterns that define a "bad" part, even if the scratch is in a different spot every time.
3. Real-Time Inference
The model runs on an Edge GPU locally. It processes the image in milliseconds—faster than the line speed—and sends a "Pass/Fail" signal to the PLC.
3. Deep Learning Architectures for Vision
Not all "AI Vision" is the same. We select the specific architecture based on your defect type.
A. Object Detection (YOLOv8 / Faster R-CNN)
Best for: Counting objects or finding large defects. Logic: Draws a bounding box around the defect. Speed: Extremely fast (Real-time at 100+ FPS). Use Case: Verifying if all 6 screws are present in an assembly.
B. Semantic Segmentation (U-Net / DeepLab)
Best for: Precision measurement and complex surface defects. Logic: Classifies every single pixel as "defect" or "background". Accuracy: Pixel-perfect precision. Use Case: Measuring the width of a scratch to see if it exceeds 0.5mm tolerance.
C. Anomaly Detection (Autoencoders / GANs)
Best for: "Golden Sample" comparison when you have no bad data. Logic: The AI learns what a perfect part looks like. Anything that deviates is flagged. Advantage: You don't need thousands of "defect" images to train it. Use Case: Inspecting medical devices where defects are extremely rare (1 in 1 million).
D. Optical Character Recognition (OCR/OVR)
Best for: Reading text, serial numbers, and expiry dates. Logic: Decodes alphanumeric characters even on curved or reflective surfaces. Use Case: Verifying lot codes on pharmaceutical bottles.
Hardware Guide: Seeing the Invisible
Software is only as good as the image it receives. Poor lighting = Poor AI performance.
1. Camera Selection
- Global Shutter: Mandatory for moving production lines. Captures the entire image quickly.
- Rolling Shutter: Avoid. Causes "jello effect" distortion on moving objects.
- Resolution:
- 5MP: Standard for macro defects.
- 12MP-20MP: Required for microscopic cracks on large parts.
- Line Scan: For continuous web materials (steel, paper, textiles) moving at high speed.
2. Lighting Techniques (The Secret Sauce)
- Bar Lights: General purpose illumination.
- Backlights: Creating a silhouette to measure dimensions or check liquid fill levels.
- Coaxial Lights: Eliminating shadows on flat, reflective surfaces (PCBs, polished metal).
- Dome Lights: Diffused light for shiny, curved objects (ball bearings, soda cans) to prevent glare hotspots.
- Darkfield Illumination: Low-angle light that makes scratches "glow" against a dark background.
3. Edge Computing Hardware
- NVIDIA Jetson Orin: Embedded IP65-rated units for deploying right on the manufacturing line.
- IPC (Industrial PC): Rack-mounted servers for powering multiple cameras simultaneously.
The Defect Dictionary: What AI Can Catch
We categorize defects into three tiers of difficulty.
Tier 1: Gross Defects (Easy)
Caught by basic rules-based vision or simple AI.
- Presence/Absence: Is the cap on the bottle?
- Color Mismatch: Is the red wire in the blue terminal?
- Gross Deformation: Is the box crushed?
Tier 2: Surface Anomalies (Moderate)
Requires Supervised Deep Learning.
- Scratches: Surface abrasions on metal or plastic.
- Dents: Depression in material without discoloration.
- Contamination: Dust, oil, or foreign particles on clean surfaces.
- Short Shots: Incomplete plastic injection molding.
Tier 3: Complex Texture Defects (Hard)
Requires Advanced Segmentation or Unsupervised Learning.
- Mura: Subtle clouding or uneven brightness in display panels.
- Orange Peel: Paint texture irregularities.
- Porosity: Micro-voids in metal casting surfaces.
- Fabric Weave: Threads patterns that shift naturally but contain a single broken thread.
Integration: Rejecting the Bad Part
Detecting the defect is step one. Removing it from the line is step two.
The "reject Signal"
When the AI detects a defect, it sends a 24V digital I/O signal to the PLC.
- Latency: The total time from "Camera Shutter" to "PLC Signal" must be known (typically 50-200ms).
- Tracking: The PLC tracks the bad part's encoder position until it reaches the reject station.
Reject Mechanisms
- Air Blast: For light parts (chips, pills, caps).
- Pusher/Diverter: For boxes, bottles, and rigid parts.
- Drop-Down Flap: For bulk materials on conveyors.
- Robot Pick: A delta robot picks the bad part and places it in a "Review Bin".
The "False Reject" Strategy
It is better to reject 1 good part than to ship 1 bad part.
- Tune for Sensitivity: We bias the model to be over-sensitive.
- Manual Review: "Suspect" parts are routed to a human QC station. The human confirms if it's real scrap or a false alarm.
- Continuous Learning: The human's decision is fed back into the AI to retrain it, reducing false positives over time.
Real-World Case Studies
BMW: 90% Defect Reduction
In their Dingolfing plant, BMW implemented AI to inspect sheet metal parts.
- Challenge: Identifying microscopic cracks in stamped metal.
- Solution: AI analyzed images of every part.
- Result: 90% reduction in defects slipping through, effectively solving the issue of human eye fatigue.
Coca-Cola: 99.8% Inspection Precision
- Challenge: Ensure every bottle cap is sealed, labeled, and filled correctly at massive speeds.
- Solution: Vision inspection on bottling lines.
- Result: 99.8% accuracy, protecting brand reputation and preventing leaks.
AgenixHub Electronics Client
- Challenge: Inspecting PCB solder joints.
- Result: Reduced false rejects (good parts thrown away) by 60%, saving $1.2M annually.
Implementation Strategy: From Pilot to Production
Phase 1: Data Collection (Week 1-2)
- Mount cameras.
- Record images of production without making decisions.
- Build a library of "Defect Types" (Scratches, Dents, Color mismatch).
Phase 2: Model Training (Week 3-4)
- Label the images (draw boxes around defects).
- Train the AI model.
- Target: Achieve >95% accuracy on test data.
Phase 3: Shadow Mode (Week 5)
- Run the AI alongside human inspectors.
- Compare AI decisions vs. Human decisions.
- Result: Usually reveals that AI catches more true defects than humans.
Phase 4: Live Deployment (Week 6+)
- Integration: Connect to the reject mechanism via standard industrial protocols (Profinet, Ethernet/IP, Modbus).
- Automated Sorting: The system now physically removes bad parts without human intervention.
- Continuous Learning Loop:
- The AI rejects a part.
- A human QC lead reviews the "Reject Bin" once a shift.
- If a good part was rejected (False Positive), they click "Mark as Good" on the dashboard.
- The model retrains overnight and is smarter the next morning.
Detailed Implementation Checklist
Week 1: Feasibility & Optics
- Defect Definition: Create a standardized "Defect Catalog" with photos of every defect type (Scratch, Dent, Bur, Color, etc.).
- Optics Lab Test: Send samples to AgenixHub to determine the correct Camera + Lens + Light combination.
- Outcome: "We need a 12MP Global Shutter camera with a Red Coaxial Light."
- Environment Check: Measure vibration and ambient dust levels at the installation site.
Week 2: Hardware Installation
- Mounting: Install rigid aluminum extrusion frames to hold cameras vibration-free.
- Triggering: Install photo-eyes (sensors) to trigger the camera exactly when the part passes.
- Cabling: Run shielded Cat6 or Fiber cables to the Edge Compute cabinet.
Week 3: Data Collection (The "Golden" Dataset)
- Capture: record 10,000 images of normal production.
- Scrap Collection: Manually place known bad parts on the line to capture images of defects.
- Annotation: Use our labeling tool to draw bounding boxes around defects in 500 images.
Week 4: Model Training & Validation
- Training: Spin up a cloud training job (taking 4-12 hours).
- Validation: Run the model against a "Holdout Set" of images it has never seen.
- Acceptance Criteria: The model must achieve >99% recall (catching bad parts) and >95% precision (not rejecting good parts).
Week 5-6: Integration & Go-Live
- Shadow Mode: Run system for 1 week without active rejection. Compare log files with manual inspection sheets.
- HMI Setup: Configure the touch screen for operators to see live images and counts.
- Go-Live: Enable the physical rejecter.
- SOP Update: Update Standard Operating Procedures for line operators.
Estimate Your Quality Savings
Quality improvements drop directly to the bottom line. Use our calculator to estimate potential savings from finding defects before they leave your plant.
Frequently Asked Questions
What types of defects can AI detect?
Almost anything visible. Surface defects (scratches, dents), assembly errors (missing screws, wrong orientation), labeling issues (misaligned, wrong text), measurement drift, and packaging seals.
Do I need thousands of "bad" parts to train the AI?
No. Modern "One-Shot" or "Few-Shot" learning and "Synthetic Data generation" mean we can often train robust models with just 20-50 examples of defects, or even train only on "good" parts (anomaly detection).
What is the ROI of AI Quality Control?
Extremely high (Up to 1900% reported). The payback period is typically 3-6 months. The biggest value comes not just from reducing labor, but from reducing scrap (waste) and protecting against massive recall costs.
Does AI replace quality managers?
No. It empowers them. Instead of acting as "police" who sort good from bad, quality managers become Process Engineers. They use the data from the AI ("Why is Mold #4 producing 50% of the defects?") to fix the root cause upstream.
What is the "False Reject Rate" (FRR)?
The percentage of good parts the system accidentally throws away. In manual inspection, this is often 5-10% (operators playing it safe). With AI, we tune this to < 0.5%. Math: If you produce 1M parts/year @ $100 each, and reduce False Rejects from 5% to 0.5%, you save $4.5 Million in pure profit.
Can it inspect inside a bottle or complex assembly?
Yes. We use special optics:
- Borescopes: For looking inside cylinders/engines.
- 360° Pericentric Lenses: To see the top and sides of a bottle cap simultaneously.
- X-Ray / CT Integration: For non-destructive testing (NDT) of internal voids in castings (though this is much more expensive than optical inspection).
How often do we need to retrain the model?
Only when the process changes.
- New product variant? -> Retrain (Add new class).
- New supplier for raw material? -> Maybe (if looks different).
- Changing a light bulb? -> No (software handles brightness normalization). Generally, steady-state production requires model updates once a quarter to capture rare "edge case" defects.
Is cloud connectivity required?
No. The inspection happens on the Edge Device (On-Prem). Cloud is only used for:
- Backup of image data.
- Training new models (heavy compute).
- Centralized dashboards for looking at 10 factories at once. For defense/regulated clients, we can do 100% On-Prem Training on a local server.
What about line vibration?
Vibration is the enemy of resolution. We mitigate this via:
- Fast Shutter Speeds: Freezing motion (1/20,000 sec).
- Strobing Lights: Flashing the light brighter than the sun for 50 microseconds.
- Software Stabilization: Aligning the image digitally before processing.
Can it read handwritten text?
Yes. Modern "Transformer-based" OCR models (TrOCR) are incredibly good at reading messy handwriting on forms or labels, though we always recommend printed text for reliability.
How do we handle "subjective" defects?
We quantify them. Operator A says it's "too scratchy." Operator B says "it's fine." AI needs numbers. We define: "A scratch is a defect if it spans > 3mm in length or has > 10% contrast difference." This forces the Quality Team to create a Standard.
What happens if the lens gets dirty?
The AI detects it. We train a specific "Dirty Lens" class. If dust settles on the camera lens, the system alerts maintenance: "Camera 4 Vision Obscured - Please Clean." It stops inspections rather than making bad decisions.
Can it work in low light?
Not really. Physics applies. Cameras need photons. However, we make our own light. We install high-intensity LED illuminators that overpower the ambient light in the factory. This means the system works exactly the same whether it's day, night, or the lights go out.
What is the typical latency?
10ms to 200ms.
- Simple Presence Check: 10ms.
- Complex Surface Inspection (5MP image): 50-100ms.
- 3D Point Cloud Analysis: 200-500ms. We size the hardware (GPU) to match your line speed (Takt time).
Can it distinguish between grease and a scratch?
Yes. This is where Multi-Spectral Imaging helps.
- Grease might be invisible in RGB but glowing black in UV light.
- A scratch casts a shadow; grease does not. By combining different lighting angles, the AI can distinguish the texture and material properties, not just the color.
Key Takeaways
- Stop Relying on Eyes: Human inspection is fundamentally flawed for high-speed, repetitive tasks.
- Catch it Early: The cost of a defect increases 10x at each step of the process. Catching it at the source is cheapest.
- Data is Gold: Every image captured is data you can use to optimize your production process.
Summary
In summary, AI-powered quality control is the most effective way for manufacturers to achieve zero-defect production. By automating visual inspection with computer vision, companies can eliminate human error, reduce massive scrap costs, and protect their brand reputation from expensive recalls and warranty claims.
Recommended Follow-up:
- Manufacturing AI Implementation Guide
- Manufacturing Predictive Maintenance
- Supply Chain Optimization AI
Ready to achieve Zero Defects? Contact AgenixHub for a proof-of-concept visual inspection demo.
Don't let defects drain your profits. Deploy AI quality control with AgenixHub today.